SUPPLIES:
-Blank Card 6.5 x 5 inches
-Cricut and Fabulous Finds
-Glossy Cardstock by Ranger
-Brown Cardstock
-TSUKINEKO ink: Terra Cotta & Walnut Ink (spray's found at Michaels)
-Hobby Lobby Stamps: Distress Background (The paper pierced paper)
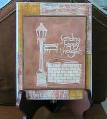
Sending Happy Thoughts
Lightpost and Brick Wall
-White embossing powder & Heat Gun
-Ink Applicator Tool by Ranger
-Ranger's Adirondack Alcohol Inks for the Background : Copper Mixatives
and ButterScotch
-Paper piercer by Making Memories
-Stitching Template by Crafters Workshop (Hobby Lobby & Archivers)
-Cosmetic Wedge
This is the first time I've used these products togethor to make a card. I'm definetly going to make more.
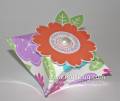
First, I used Fabulous Finds (cricut cartridge) to cut out the background.
Then I took my ink applicator tool and put Butterscotch ink on it and pound away on the Glossy Cardstock. I wanted it just a little darker so I used Copper mixatives around the edges that were visible. Put that to the side.
Next, I did the very top layer of the card. I took my "Lightpost and Brick Wall" and inked it with an embossing ink pad and pressed it on another piece of Glossy Cardstock. Covered it with white embossing powder. I repeated that with the "Sending Happy Thoughts" stamp. Then heated them both.
Now we do the inking. I took a cosmetic wedge and put a very small amount of rubbing alcohol on it and sprayed the Terra Cotta TSUKINEKO ink on it and blotted the cardstock. I did 4 layers I believe. Just do it until you get the effect you desire.
TIP: If you want some shading to make some areas look a tad darker then do the last layer of your inking in only certain areas. Don't cover the entire piece. It looks like leather when it's all dry. When done, I matted it with brown cardstock.
Next, I worked on the 2 paper pierced squares. I didn't really measure the squares I just cut them out. I used another stamp using the same technique. This stamp is the "Distressed Background". I used the Walnut Ink on these 2. I did paper piercing on the visible edges.
When I did all the pieces I attached the background. I raised the 2 squares with pop dots. I also raised the top piece with more pop dots. Gives it dimension.